Tuesday, August 31, 2010

Tuesday Teachings - The Letter K

Another week, another letter. We are moving on to the letter K this week. Please feel free to download your copy of the letter K below.

Letter K

Words that start with the letter K: King, Kangaroo, Kite, Keep, Kids, Kiss, Kelp, Kind and Kick


As our first craft, I really wanted to make a kangaroo but could not figure out how to make one from the letter K so we did the next best thing. We made a Kangaroo pouch! It is very cute. Stack two pieces of brown construction paper together and cut them out in a pouch pattern. Trim the front of the pouch a little across the top so that the back of the pouch is taller. This will make it easier to get in the pouch. Once they are cut out, punch holes all the way around the perimeters. You will then take yarn (we only had blue) and wrap tape around one end and use it as the "needle" to stitch the two pouch sides together. You will want to leave a 6"-8" tail on each end to tie around the waist. Once it is stitched together, write a big K on the front and tie it around a waist.


Next up, we used our Dot Markers to decorate a letter K. While he used the markers, I cut out two crowns from yellow construction paper. Once he finished coloring I let him glue on the two crowns and turn his K into a King.


This next project was a bit aggravating but he used the Dot Markers again on three Kleenex. We then tore the Kleenex into pieces and glued them on to the K.


For our final project we wanted to make a Kite. I let him paint two of the letter K printouts. Once dried, we cut them out and put them end to end to form the diamond of a kite. We used crepe paper for the tail of the kite.

Foods that start with K: Kabobs, Key Lime Pie, Kit Kat, Kool-Aid, Kiwi, Kohlrabi, Ketchup and Kielbasa


We went with an old classic, rice Krispie treats! I won't post a recipe as almost everyone has made them before and the recipe is right on the box. We did spice it up a little and add sprinkles!

Have a great week and have your kids point out the letter K to you this week!

We are linking up to:

The Attached Mama's Alphabet Craft Collection

abc button

Monday, August 30, 2010

September 2010 Calendar

Here is your new calendar for the month of September. We have some great ideas on there this month. Print your copy below.

September 2010 Calendar

Monday Meanderings - Thank a Teacher

As the kids are all back in school, this would be a good time for kids to take a moment and thank their teachers for all of their hard work.


A great, inexpensive gift is a candy bar with a homemade label on it. See Teaching Heart Mom for a great sample.


Next up is Little Birdie Secrets with these adorable fabric covered thumbtacks. They are cute and you could even throw in a cork board to go with them.


Last but not least, is Domestically Speaking with an adorable M M Treat Jar that is accompanied by a very sweet poem.

You can also make some crafts to give the teacher, hopefully some of those crafts will be in our near future and we can post them here.

Friday, August 27, 2010

Show Me the Money! (Experiment)


A really great experiment to do with kids involves exactly two supplies.

A dollar bill (any denomination will work) and a non-flexible magnet.

In my house we have been playing with a big magnet, trying to see what it will stick to and what it will not stick to. I had seen this experiment as a kid and I realize my son does not get the significance of it, but he still had fun.

Fold the dollar bill in half, with one  half on the table and the other half sticking up in the air. Use your magnet and see if the dollar bill is magnetic or not. The dollar is slightly magnetic but it is stronger in some areas more than others. My son thought it was funny that it "danced" around when the magnet got near it.

The reason the dollar is magnetic is a special printing process used by the US Treasury Department. The magnetic ink is very light and many people think it is to prevent people from making counterfeit bills but not many people check to see if a bill is magnetic. The real reason that the bills are magnetic is to assist with the automated currency counters. The magnetic feature keeps the bills lined up in the counting machines.

Kids should be impressed that the dollar bills are magnetic and then you can run by the bank and let them see how a currency counter works.

Thursday, August 26, 2010

Chalk Paint


It has been so hot around here that we can not usually stay outside for long but if it cools down a little we try and slip out to have a little fun.


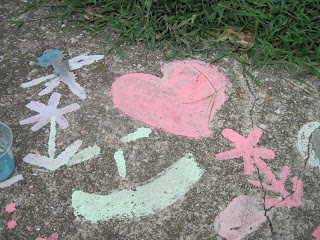
This time we made chalk paint. If you have not made chalk paint before, I highly recommend it. The colors are so bright when they dry!

Ingredients:
Cornstarch
Water
Food Coloring

I mix equal parts cornstarch and water in a measuring cup. I usually start with 1/2 cup of each. Once they are well mixed, without lumps divide the mix evenly between the number of colors you want. I use plastic cups to paint from so I pour the chalk mix into the cups and then add enough food coloring to get a good color. It usually takes 8-10 drops for a vibrant color.

We then go out on the sidewalk and paint away, using the cheap foam paint brushes that I get in a package of 10 at the dollar store. You do NOT want to use nice brushes on the sidewalk, just buy the cheap ones.


I will forewarn you, if your child is anything like mine, he will probably look like a Smurf when you finish. I have never had a problem with the chalk paint not coming off once we get in the tub. It rarely comes off though when we are just cleaning up after painting, he has to be physically submerged in the water. Have fun and let your inner Picasso run wild!!

Wednesday, August 25, 2010

Tuesday, August 24, 2010

Tuesday Teachings - The Letter J

Another week, another letter. This week we are moving on to the letter J. Please feel free to download our letter J to use.

Letter J
Words that start with the letter J:
Jungle, Jump, Jolly, Jewish, Jab, Job, Joke, Jug, Jar, Junk, Jackal and Jamboree.


For our first craft, we decided to make Jellyfish. This was a great project and my son even talked my husband into getting in on the action, hence there are three Jellyfish. We used markers to color on coffee filters and once we finished we sprayed the filters lightly with water to allow the colors to bleed a little. We waited for that to dry and then we took a pony bead and thread it on a piece of yarn, this ends of the yard were then put through a disposable cup bottom that had a hole poked in it. The bead kept the yarn in place. Next we cut a hole in the center of each of the jellyfish and put them on the yarn and tied the yarn in a knot at the top to hang it up. We then used ribbons and crepe paper to make the tentacles, we just taped the tentacles to the bottom of the coffee filters.


The next project was Jewels. We glued jewels to a letter J. My son really enjoyed getting to use the glue. We usually use a glue stick but with all of the back to schools sales, we stocked up on some white glue too and this was his first chance to squeeze glue.


For our final craft, he colored a letter J with markers (his new preferred medium). I then cut it out and we glued it to another piece of paper with a little extension of construction paper to represent the cockpit.

Some foods that start with the letter J:
Java, Jelly, Jellybeans, Jalapeno, Java, Jawbreakers and Jambalaya

As a snack, I had big ideas about making some homemade Jam. I found an easy recipe that called for just thawed berries, honey and lemon juice. Sounded easy enough but my son "misplaced" the honey since he loves the bear jar and when I blended up the berries, they just turned into juice. I had been working all day, my son was cranky and the whole process was making me Jittery (another J word)!


I quickly changed gears and pulled out the frozen package of Jamba Juice Smoothies Mix, added some apple Juice and blended it all up for a refreshing snack. I hope you can forgive me considering all of the J words I included in the excuse.


Have fun working on the letter J with your kids.

The Attached Mama's Alphabet Craft Collection

Monday, August 23, 2010

Monday Meanderings - Sensory Tubs

I am sure that if you have spent much time around learning/Mom blogs you have probably seen some great Sensory Tubs out there. I thought we would feature some great ones this week.


First up is this great tub from Counting Coconuts. This is a yellow tub that she came up with and it is very creative. She has a strawberry huller in there for her son to pick out the items and work on his fine motor skills. I have to be honest though, my favorite thing about this tub (other than the color) is the bingo card that she created to bump up the learning. She also has a great section on her blog of past tubs she has created.


The Mom Blog has some great ideas also. I love the cotton balls and turkey baster idea. What a great way to work on fine motor skills. If you have a child that has not mastered finger control yet, let them work a turkey baster for awhile.


With Fall upon us, I also love this Apple and Acorn Tub at No Time for Flashcards. Not only is the tub lots of fun, but she also includes some great books to read as a follow up on the theme.

And last but not least, Child Fun has a great list of items that can be used as the "filler" in a sensory tub.

I would feel awful advising you to have a sensory tub without some pointers on how to contain the mess.
  • If you are going homemade, I suggest the plastic containers that are wider than they are deep. It is easier for the kids to get their hands in there.
  • As our house we have several vinyl tablecloths that I picked up for cheap. They are flannel backed which means if you have carpet, they stick right to your carpet and will not slide around. We set down a tablecloth and then put the messy activity on top of it.
  • You could also get a container that is bigger than your sensory tub and put the tub inside the larger container with hopes that most of the mess falls into the bigger container, just to be poured back into the sensory tub.
Have fun!

Friday, August 20, 2010

Family Game Night - The Game of "If..."

It is time for another Family Game Night and we have a new game for you.

There is this great book called If.. Questions for the game of life by Evelyn McFarlane. This is an extraordinary book in that it asks very thought provoking questions. I thought for your family game night it would be fun to have a game of If that is geared towards kids and parents.

Here are some questions:

If you could have any animal as a pet, what would you choose and why?
If you were responsible for planning the family vacation, where would we go?
If you could have any friend become your brother or sister, who would you choose?
If you were able to plan a fun day with one parent, what would we do all day?
If you could buy any one toy in the toy store, which would you choose?
If you could do anything you wanted that you are currently "too young" for, what would you do?
If you could play any musical instrument, what would you play?
If you had a money tree, what would you buy first?
If you had three wishes, what would you wish for?
If you could only wear one color for the rest of your life, which color would you choose?
If you could be any TV character, who would you be?
If you could only eat one food for the rest of your life, which food would you choose?
If you never had to eat a food again, which food would you choose?

This should be a great start for your family. Enjoy Family Game Night.

Thursday, August 19, 2010

Hawaii Craft


On August 21st, 1959 Hawaii became the 50th state of the United States. This will be a great time to make a lei with the family and even share in a tropical dinner. If you can't go to Hawaii, bring Hawaii to you!

For recipes, a good place to start will be Kids Cooking Activities.
They have a variety of recipes for theme dinners with kids and the Hawaiian Luau is no different. I love the recipe for the Creamy Tropical Drinks that are served with little umbrellas.

If your family is not very adventurous, you could always prepare a "Hawaiian Pizza", which is a pizza with tomato sauce, cheese, ham and pineapples. It is always tasty.

For a Hawaiian craft we decided to make a Lei. There are many wats to make leis but since my son is only three we went with an easy craft.


Supplies:
Yarn
Paper flowers or artificial flowers (with a hole punched in them)
Straws that are cut into 2"-3" pieces

Thread 4 pieces of straws onto your yarn then alternate between one flower and one straw piece until the lei is large enough for you. At teh end, thread on 4 more pieces of straw and then tie the yarn into a knot.

Tuesday, August 17, 2010

Tuesday Teachings - The Letter I

Getting back on track with the alphabet and this week is the letter I.

Normally I woudl have a link here for you to go to Scribd.com to print out a copy of the letter I to use with your kids but it has come to our attention that Scribd is planning to charge people to download from their site. This does not follow the goal of our blog or our Kids Matter campaign so we are looking for a new service. Until we locate that new service we have them on our secondary server for your download. It is not as convenient because there is no picture to go along with it on the blog but you can still download from us for FREE!

The Letter I


Words that start with the letter I: Island, Icebox, Iceberg, Iceland, Icon, Identify, In, Ignite, Iguana, Ill, Ink, Illinois, Indiana, Illustrate and Imagination


We started our crafts with Ice Cream. We decorated the letter I with markers and then cut out our letter and glued it to a piece of construction paper. While he decorated the letter I, I was busy cutting out some "Ice Cream" scoops from different colors of construction paper. We then glued the ice cream scoops on top of the I, using the I as our sundae cup.


For our next craft we decided to make an Insect. I let my son color the page with markers and then we cut out the I and glued it to a piece of construction paper and drew on six legs and two eyes. As an extension of this project we went outside on an insect hunt but it was too hot for even the insect to be out.


Our last I craft was an Indian headdress. This time my son glued feathers to the letter I. While he was gluing I cut two strips from brown construction paper and wrapped them around his head to get the size right. I taped the pieces of paper together to make the head band. Once he was finished with the feathers, we glued the page to a page of construction paper for strength as I had printed the letter I on regular printer paper. I then cut out the I and glued it to the front of the head band.

As for a snack, there are not many foods that begin with the letter I, so that makes it a bit of a challenge but these are the ones I came up with: Ice Cream, Iceberg Lettuce, Icicles,


For our snack, we made Icees! They were pretty tasty.

Supplies:
Frozen juice concentrate (we used orange but think limeade would also be good)
Frozen Sherbert (again we used orange but get the flavor to go with your drinks)
Soda (orange or lemon-lime)

Put half of the container in the blender with 3-4 scoops of sherbert. Pour in enough soda to come about 2" above the sherbert. Blend well. If you do not have a blender, you can also make this in a bowl with the back of the spoon. I know this since we have a new blender and I did not read the directions and ended up with the first icee all over the counter!

I hope you have a great time working on your letter I crafts!

The Attached Mama's Alphabet Craft Collection

Monday, August 16, 2010

Monday Meanderings - Joke Day

In honor of today being National Joke Day, I looked for some good jokes for kids to pull on friends and parents, and some that we can even pull on the kids.

Have some good, clean fun today!


Love to Know has some great practical jokes listed. I love the "Trapped in a Toilet Paper" prank. That would be very funny.


Kidz World has a listing of jokes that will not get kids in too much trouble when they give them a try. The most "harmless" one is colored milk.

I found another page of jokes on Love to Know that has some more great jokes. I might try the suds fun joke myself!

These practical jokes should be a great start to prank your kids and family. Have a great day and remember to laugh enough. Also remember that kids like for people to laugh at their jokes, so encourage your kids with a deep belly laugh when they tell you jokes or attempt to prank you.

Friday, August 13, 2010

Family Science Night - Volcanoes

Before we get to the good stuff (namely the actual volcanic eruption) lets learn some facts about volcanoes and impress the kids.

  • There are approximately 1,510 "active" volcanoes in the world. Scientist currently know of about 80 volcanoes that are under the ocean.
  • A volcano is a land form (usually a mountain) that opens downward to a pool of magma (molten rock) below the surface of the earth. It is a hole in the Earth from which lava (molten rock) and gas erupts.
  • Magma is liquid rock that is inside of a volcano.
  • Lava is liquid rock (magma) that flows out of a volcano. Fresh lava ranges from 1,300° to 2,200° F and glows red hot to white hot as it flows.
  • The Earth's surface is made up of huge plates called slabs. These slabs sometimes move. When they move one plate is pushed below another plate and magma is pushed up between the two plates.
  • Somewhere around the world there are approximately 20 volcanoes erupting as you read this. The majority of these eruptions are happening under the ocean and geologists may not even know about them.
  • There are a total of 103 volcanoes in the United States. The breakdown is: Alaska (34), Arizona (8), California (9), Hawaii (10), Idaho (2), New Mexico (8), Oregon (21), South Dakota (1), Utah (2) Washington (6), and Wyoming (2).
Now on to the fun part, building your volcano!


Supplies:
A container to build in and to catch the "lava".
A disposable cup
Aluminum Foil
Dough ( we got our color by mixing together all of the red, blue, green and yellow doughs)


We used a mold for making stepping stones to build our volcano in but you can use a pie pan or a cake pan or any other container that you have handy. Put the cup in the middle of the container and then put a wadded up ring of foil around the cup. Next take sheets of foil and lay them over your cup, folding then into the inside of the cup by about half an inch. The rest of the foil will be molded around the wadded foil ring. Do this all the way around the cup.


Next you will take your dough and make it nice and pliable. I made mine into flat sheets and laid it over the foil form, lapping it into the inside of the cup again by about half an inch. Do this all the way around your volcano, covering all of the foil form. We let our volcano sit for a few hours before we proceeded onto the eruption, just to let the dough dry out a little bit. We used cheap dough and it was very sticky! This would also be a good time to put in some little plastic trees, animals or people if you wanted also. We did not do this as we did not have any cheap accessories that were available.


Now to make the eruption!
Supplies:
Baking soda (about 2-3 tablespoons per eruption)
Red food coloring
Vinegar (1/4 to 1/2 cup per eruption)

Put the baking soda in the cup (volcano). Mix the vinegar and the red food coloring in a separate container. Once it is a good color, pour it into the cup and then step back and wait for the eruption.

Pouring in the "lava" (vinegar & food coloring)


The eruption continues.


It begins to subside


The after picture.

Thursday, August 12, 2010

A Healthy Family

Kid's Activity Pyramid

There are many things we can do to keep our family healthy. One of the easiest things to do is to just go outside and play. You can play games of tag, hide and seek, kickball, throw a ball, red light/green light or Simon Says. Regardless of the age of your children, you can play a game out side with them.

The youngest kids will understand Simon Says and red light/green light, the older kids will enjoy badminton volleyball, basketball or just tossing a ball around. It does not take a lot of forethought to do these activities and not only will it improve your health and the health of your child but it will also improve the relationship you have with your kids. If you do not already have some of the games that requires equipment, now is the time to purchase it. Stores are marking everything down to super clearance in preparation for fall and winter so summer items have to go. There is still plenty of time for you to use these activities outside though.

Another great thing you can do is a 5K walk or run with the whole family. Pick a local charity and participate in their event. Not only do you get to exercise but you can teach your child about philanthropy by collecting donations. Here in Lexington we can refer to a local shoe store's race calendar, John's Race Calendar. If you look at this calendar you will see that there is at least one race every weekend that is within a short distance of our town. I bet your town is the same way.

If you do not want to do a 5K, you could always put together a race for your family and a group of friends. It would be easy to go to a local track and perform your race. Before arriving, pick a few events or distances. You could have the Dads compete, the Moms compete and the kids compete. The winners of each event would receive a small award like a trophy or a medal. Be sure you have plenty of water and sports drinks on hand along with some oranges, apples and bananas to keep everyone healthy. If you do not have access to a local track, do an obstacle course at the local playground.

If you want it to be a longer lasting activity, buy pedometers for the whole family then pick a destination. From Lexington, maybe I would pick Kings Island in Ohio. When I go to Mapquest I see that it is about 115 miles. When I looked around online I discovered that 2,000 steps is about equal to 1 mile so we would have to walk 230,000 steps to get to King's Island. You could do a graph for each family member that you log the steps to every night. You can compete to see who gets to Kings Island first. It does not have to end with you actually going to the amusement park but it would be fun to then go to the place you are "walking" to.

There are lots of great ways to keep healthy and to teach your children how important it is to use their body every day. Maybe just playing in the backyard with Mom and Dad will teach the kids to love their bodies and to take great care of their bodies.

Tuesday, August 10, 2010

Learning our Colors - A felt board game (2)


Here is another felt board game that I made for my son. Once again, I just purchase the cheap craft felt that is 5 sheets for $1. I trace all of my patterns and then I cut them all out.

We put them up one fish at a time and do a different recital of Brown Bear, Brown Bear. My son puts up the first fish and I say "Purple fish, purple fish, what do you see? I see a WHITE fish looking at me." Then my son takes the white fish and puts it on the board. We continue through all of our fish colors and when we have the last fish up (in this case he will be yellow) I say "Yellow fish, yellow fish what do you see?" and my son is supposed to recite all of the colors back to me. He is not quite there yet so I assist him when needed, but he does try hard! As you can see, I have 11 fish cut out currently but we never use more than 4 right now. I do not want him to get frustrated. As he gets better at the game, we will pull out more fish to play with.

He loves this even more than he loves the original Brown Bear book, which is no small feat since I have read that book enough to recite it word for word.

I have also included a pattern for cutting out the fish shapes. Hope you enjoy this game as much as we do.

Fish Pattern

Monday, August 9, 2010

Monday Meanderings - Lunchtime

In Fayette County, the public schools are back in session this week so I am doing another post on healthy lunches.


This first link is Obento Baby. Most of the meals are for smaller children. My favorite thing about bento lunches is that there is a variety of items in the boxes so the kids (or adults) are getting a good variety of colors and tastes. I mean, seriously anyone can eat one carrot. Right?


Next up is Maisie Eats Bento. This is a great blog for ideas for lunch and snack bentos. There are fresh takes on old classics that kids love.


Healthy Lunch Idea epitomizes exactly what I am going for. A healthy alternative to the processed foods that schools serve. This is not just geared towards kids though, adults need to eat healthy also.

I hope you will take the time to explore these links and to talk to your child about making healthy choices. When you get the school menu, sit down and go over it with the kids and talk about the healthy choices on there. It is fine to eat an occasional treat but kids need vitamins and minerals to make it through a long day at school.